I took part in a Kickstarter project to build "The ultimate Dashcam". One with front and back cameras that would shoot in HD, was durable and low power, and would upload video clips to the cloud with the push of a button. We'll after waiting more than a year, they did just that. I received my Dride Zero a couple of days ago and, other than an initial rocky "Setup" process, it has been working fantastic.
This post isn't so much to talk about the Dride, you can get that information from them at https://dride.io. This is more for those people who might run into the same issues with Setup that I had. Hopefully this will save them some of the time I wasted trying to figure it out.
Misc Topics
To Access the Dride Programatically - There are a lot of really cool things you can do with the API access. To see some of them, check this out:
Connectors:
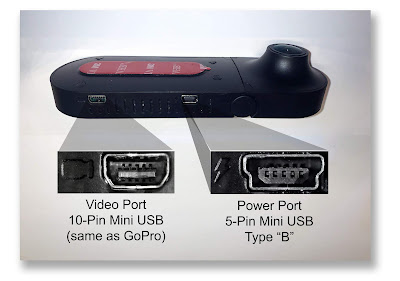
The connectors on the Dride are hard to identify because the icons are so small. The Female connector in the middle of the side is a USB-B power connector. The one near the end of the Dride is a 10-Pin USB connector for the rear video camera.
This post isn't so much to talk about the Dride, you can get that information from them at https://dride.io. This is more for those people who might run into the same issues with Setup that I had. Hopefully this will save them some of the time I wasted trying to figure it out.
Dride Zero
Getting Started
1) Unpack from the shipping box. To get started all you need at first is the
Dride Camera, the powercord that has the cigarette lighter connector, and a
16Gb type 10 Micro SD card.
2) Insert the 16Gb Micro SD card in the slot on the side of
the Dride. Make sure you push it in far
enough that it stays in place, the spring doesn't pop it back out. To remove the card you'd push it in a little
more and then the spring would pop it out.
At this point you want to leave it correctly inserted into the Dride.
3) Plug one end of the power cord into the female power slot
on the Dride Zero (see image). The Power slot is on the side of the Dride
towards the middle. There is also a USB female
connector that is on the side, but that one is towards the end of the Dride. Do not mix up the two and put the power cord
into the USB connector. Make sure you power
cord is in the middle of the Dride.
4) Plug the other end into the cigarette light in your
car. For this Setup process you MUST use
power from the cigarette lighter. Power
from a USB port on another device will not work and could damage the Dride.
5) Once the Dride powers up, connect your phone to the Dride
WiFi. Make sure you have modified the
WiFi settings on your phone to be connected to the Dride. Use "ilovedride" as the WiFi password. This will not work unless you are connected
to the Dride WiFi.
6) Once the Dride is powered up and connected to the Dride
WiFi, simply start the Dride App. It
should automatically take care of the rest.
You'll see it search for your Dride, find it, and it will go through the
rest of the setup process with you. If you
do steps 1-5 as described above, step 6 should go very smoothly.
Misc Topics
Reset – Use a pin to press and hold the reset button for 10 seconds, then release it to reset the dride to factory
settings. The reset button is located next to the SD Card slot.
LED Colors – The Dride LED changes color while in
various modes
Red - means the SD card is missing or not working
correctly. Note that you are supposed to
use a 16Gb Type 10 SD card, but a 32Gb Type 10 card often works as well. Anything bigger or slower than that will not
work.
Greed – Means the Dride is powered up
White – Means the Dride is recording.
Connect via PC - The SDK for the Dride Zero has not been release yet, but you
can connect via SSH and/or SCP. To connect
via SSH, try:
ssh pi@192.168.42.1 (password: raspberry)
Connectors:
The connectors on the Dride are hard to identify because the icons are so small. The Female connector in the middle of the side is a USB-B power connector. The one near the end of the Dride is a 10-Pin USB connector for the rear video camera.


Comments
Post a Comment